Last updated: October 2026
A backyard aquaponics setup combines fish farming and vegetable growing in one closed loop. Fish waste feeds the plants; plants clean the water for the fish. Done right, you get fresh protein and vegetables year-round — using up to 90% less water than a conventional garden.
- Aquaponics uses up to 90% less water than traditional soil gardening — one of the most resource-efficient food-growing methods available.
- A family-sized system needs at minimum a 100-gallon fish tank paired with 15–20 sq ft of grow bed to produce useful, ongoing harvests.
- The nitrogen cycle takes 4–6 weeks to establish before fish can be safely stocked at full density — rushing this step is the leading cause of early system failure.
- Startup costs range from $200–$500 for a functional DIY entry-level build to $2,500–$5,000 for a greenhouse-integrated, year-round system.
What Is Backyard Aquaponics and Why Does It Work So Well?
Aquaponics is the combination of aquaculture — raising fish — and hydroponics — growing plants in water rather than soil. In a conventional garden you add fertiliser and the plants take what they need. In an aquaponics system the fish do the fertilising for you, and the plants do the water filtering for the fish. Neither side would thrive alone, but together they form something genuinely self-sustaining.
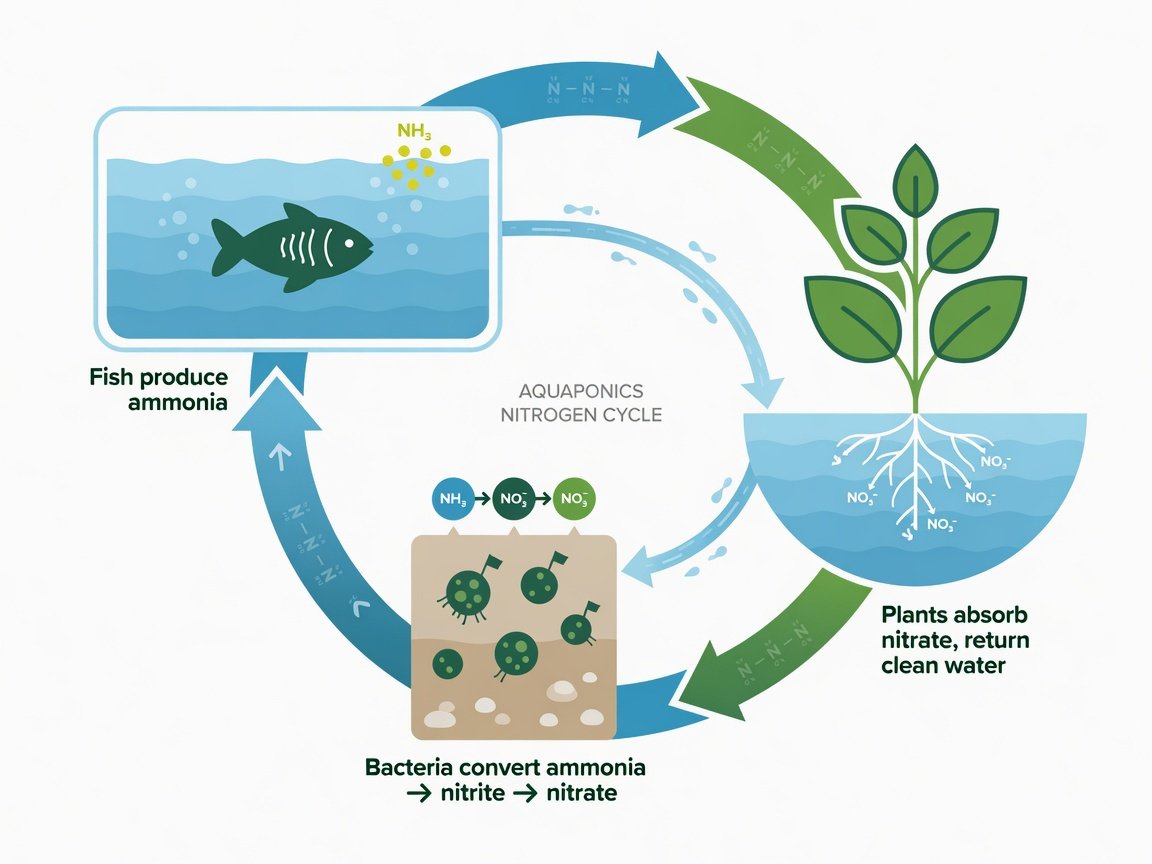
The biology is straightforward. Fish eat and excrete ammonia. Two groups of beneficial bacteria — Nitrosomonas and Nitrobacter — colonise the grow media and convert that ammonia first to nitrite, then to nitrate. Nitrate is safe for fish at moderate concentrations and is exactly what plants need to grow. Plant roots absorb it, stripping it from the water before it builds to harmful levels. What returns to the fish tank is clean, oxygenated, nutrient-depleted water — exactly what the fish need.
This tight nutrient loop explains the water efficiency. Water that would evaporate from soil or drain through a pot is constantly recirculated instead. University cooperative extension programmes studying closed-loop growing systems consistently document water savings of 85–90% compared with conventionally irrigated vegetable beds. That figure makes aquaponics one of the most defensible growing choices in 2026 as water costs and restrictions continue to increase across many regions.
You can configure the plant-growing side of the system in three main ways. Media beds — filled with gravel, LECA clay pebbles, or similar inert material — are the most beginner-friendly: they provide root support, house the bacteria colony, and act as a mechanical filter simultaneously. Raft systems (deep water culture) float plants on a foam board above a nutrient-rich pond — fast for leafy greens but less forgiving of water quality swings. NFT channels pass a thin film of water over bare roots in angled gutters — space-efficient but demanding on water chemistry consistency. Most backyard builders start with media beds and expand from there. The flood and drain media bed method is one of the most reliable approaches for a first system — the bell siphon does the heavy lifting, and the repeated wet-dry cycle actively supports bacterial activity in the media.
How Do You Plan the Perfect Backyard Layout?
The single most common planning mistake is placing the system where it fits rather than where it functions best. Spend a day mapping your outdoor space before committing to a position. You’re looking for three things in priority order: consistent direct sunlight for the grow beds, easy water access for topping and cleaning, and a drainage path that keeps overflow well away from foundations and existing planting.
Plants need 6–8 hours of direct sunlight daily for productive yields. Walk the yard at dawn, noon, and mid-afternoon, noting which areas are shaded by fences, walls, or trees at each time. A free light-meter app makes this more precise than guesswork. Fish tanks, by contrast, tolerate and often benefit from partial shade — cool, stable water holds dissolved oxygen more efficiently and keeps algae growth on tank walls manageable.
Water access matters more than beginners typically anticipate. You’ll top up evaporation losses every few days, carry out regular partial water changes, and occasionally flush components. Position the system within reach of a garden tap or a dedicated rainwater harvesting barrel. A 1,000-litre IBC tote sourced second-hand for $50–$100 can supply months of top-up water and gives you a gravity-fed source that costs nothing to run once installed.
Drainage slope — even a gentle 1–2% grade running away from the system footprint — prevents overflow from pooling under tanks or saturating timber bed supports. Waterlogged timber rots quickly and undermines the whole structure. A gravel or paved base beneath the system footprint takes ten minutes to install during the build phase and eliminates this problem permanently. Plan accessible walkways on at least one side of every grow bed: 60 cm wide for single-sided access, 120 cm if you can access from both sides without stretching.
What Size System Does a Family Actually Need?
Sizing is where most first-time builders make their most consequential mistake — usually by going too small rather than too large. Small water volumes swing in temperature and chemistry rapidly. A minimal buffer between stable and crisis is the worst place to learn aquaponics. For a family of three to four aiming for regular leafy green and herb harvests, with edible fish as a bonus every 6–9 months, the following ranges are a practical starting framework.
| Component | Starter (1–2 people) | Family (3–4 people) |
|---|---|---|
| Fish tank volume | 100 gal / 380 L | 200–250 gal / 750–950 L |
| Grow bed area (total) | 15 sq ft / 1.4 m² | 25–40 sq ft / 2.3–3.7 m² |
| Grow bed depth | 30 cm / 12 in | 30 cm / 12 in |
| Pump flow rate | 150–200 GPH | 300–500 GPH |
| Aeration | 1 × medium air stone | 2–3 × air stones or ring diffuser |
| Starting fish load | 10–15 fingerlings | 20–30 fingerlings |
The sizing rule that matters most is the grow bed to fish tank ratio: total grow bed surface area should be 1.5–2× the fish tank’s surface area. A tank with 10 sq ft of water surface needs at minimum 15 sq ft of grow bed. This ratio provides enough bacterial surface area and plant uptake capacity to handle the fish waste load. Fall below it and nitrate builds faster than plants can remove it — water changes become a constant chore instead of an occasional one.
Fish stocking density in a well-cycled, well-aerated system runs at approximately 0.5 lb of fish per gallon of water. A 200-gallon tank can therefore sustain up to 100 lbs of fish at maximum stocking — but start at 25–30% of that figure and let the system mature before pushing higher. At moderate stocking, a well-maintained 200-gallon system can support 4–6 plants per square foot of grow bed for compact crops like lettuce and herbs.
Which Fish Should You Choose for Maximum Yield?
Fish selection shapes everything downstream: the water temperature you maintain, what ends up on your plate, how quickly the system matures, and how resilient it is when water quality drifts. The best choice is the species that fits your climate, your local regulations, and your family’s eating habits — not simply the most commonly cited name in a guide.
Tilapia is the most popular edible species in backyard aquaponics worldwide for defensible reasons. It tolerates a broad range of water conditions, thrives at temperatures between 77–86°F (25–30°C), grows quickly to harvest weight, handles high stocking densities without severe stress, and produces mild, versatile meat. The one significant constraint: tilapia is tropical. In climates where winter water temperatures drop below 60°F without supplemental heating, running tilapia year-round requires either a greenhouse enclosure or an in-tank heater.
Rainbow trout is the natural alternative for cooler temperate climates. Trout prefer water between 55–65°F (13–18°C), making them well-suited to temperate spring and autumn conditions without any heating cost. They are premium table fish that command genuine culinary value — but they are considerably less tolerant of water quality fluctuations than tilapia, making them a better second fish than a first.
Other species worth considering depending on your location: catfish (extremely tolerant, fast-growing, popular in warm climates), jade perch (high omega-3 content, performs well in Australian conditions), barramundi (high market value, warm-water dependent), and largemouth bass. Ornamental species — koi and goldfish — are excellent choices when eating the fish isn’t the goal: both are hardy, widely available as juveniles, and visually impressive in a garden-integrated tank. Before stocking any species, verify local biosecurity regulations. Several high-performing aquaponics species are restricted or require permits in specific states and countries. The full guide to selecting the right fish for your aquaponics system covers stocking rates, climate matching, regional availability, and eating quality in depth.
What Plants Grow Best in Backyard Aquaponics?
Aquaponics genuinely excels at leafy vegetables, and that’s where most systems should concentrate effort — especially in the first year. The constant, gentle flow of dissolved nutrients suits fast-growing brassicas, salad crops, and herbs far better than it suits slow-developing fruiting plants. That doesn’t mean fruiting crops can’t be grown — it means they reward a mature, stable system, not a new one still finding its chemical balance.
Easiest and most productive: lettuce, spinach, silverbeet, kale, pak choi, watercress, mint, basil, coriander, chives, and parsley. These crops move from seedling to harvest in as little as 3–4 weeks in a warm, well-lit system running at pH 6.8–7.2. Lettuce in particular thrives — the consistent moisture and nitrate availability suit it better than any soil bed. A detailed look at growing lettuce in aquaponics covers variety selection, optimal spacing, and the fine adjustments that make a meaningful difference to yield and quality.
Intermediate difficulty: tomatoes, cucumbers, capsicums, beans, peas, and strawberries. These perform well in a system that has been running for at least three to six months and has built up a stable, moderately high nitrate baseline. They need significantly more nutrients per plant than leafy crops — overloading a young system with fruiting plants before the fish load can support them is a reliable way to stunt everything.
Not recommended: root vegetables — carrots, potatoes, radishes, turnips. Root development in aquaponics media is inhibited by the support structure, and harvesting roots inevitably disturbs the bacterial layer built up in the media over months. Above-ground crops in all their variety offer more than enough to fill a family’s vegetable needs.
The grow media underpinning your plant beds has a significant effect on which crops perform best. LECA (expanded clay aggregate) drains reliably and provides excellent root aeration — it’s the most widely used media for good reason, though it carries the highest unit cost. Gravel is cheaper and heavier; scoria (volcanic rock) is a useful middle ground with good drainage and surface area for bacteria. Understanding the trade-offs in detail before you fill the beds avoids expensive and disruptive re-media operations later — the comprehensive guide to aquaponics grow media options covers every common material with honest performance and cost comparisons.
What Does a Backyard Aquaponics System Actually Cost?
Budget is where many well-intentioned aquaponics projects either stall or build in false expectations. The good news is that a functional, productive system is achievable at genuinely modest cost — but the different spending tiers deliver genuinely different levels of reliability, convenience, and year-round capacity. Being clear-eyed about this upfront saves disappointment later.
| Budget Tier | Typical Cost (2026) | What You Get |
|---|---|---|
| DIY entry-level | $200–$500 | Second-hand IBC tote tank, timber-framed grow bed, submersible pump, air pump and stone, LECA or gravel media, basic test kit. Functional — minimal redundancy. |
| Mid-range backyard | $800–$2,000 | Dedicated fibreglass or poly tank, purpose-built grow beds, mechanical pre-filter, UV steriliser, digital pH/DO monitoring, backup aeration. |
| Greenhouse-integrated | $2,500–$5,000+ | Polytunnel or glasshouse structure, automated water monitoring, climate control, larger tank capacity, commercial-grade grow beds — genuine year-round food production in any climate. |
The biggest single cost variable is the fish tank. A new 250-gallon fibreglass tank costs $600–$900. A second-hand 1,000-litre IBC tote — which makes an excellent fish tank with minimal modification — typically costs $50–$150 on the second-hand market and can be cut and adapted to serve as grow bed frames too. Sourcing second-hand where possible consistently halves entry-level build costs without compromising performance.
Ongoing operating costs are lower than most people anticipate. Fish feed — the main recurring expense — runs approximately $10–$30 per month for a family-scale system depending on species and stocking density. Electricity to run the pump and aeration typically adds $15–$40 per month. Water costs are minimal given the recirculating design. The full breakdown of capital and ongoing aquaponics farm setup costs — including cost comparisons between different system sizes and approaches — is worth reviewing before committing to a build.
How Do You Cycle Your System and Get It Started Right?
Cycling is the process of growing the bacterial colony that converts fish ammonia into plant-available nitrate. It is the most patience-testing phase of building an aquaponics system — and the one most frequently rushed. Rushing cycling is the single most common cause of fish loss and early system abandonment. Give it the time it needs.
A new system at ambient room temperature typically completes the nitrogen cycle in 4–6 weeks. Colder water temperatures slow bacterial growth; warmer water up to approximately 30°C (86°F) accelerates it. You can meaningfully shorten the cycle using a bottled nitrifying bacteria inoculant — available from aquarium suppliers — or by seeding the media with a cup of established gravel from a healthy, running aquarium. Either approach can cut 1–2 weeks from the cycling timeline.
Here is the step-by-step cycling process for a media bed system:
- Assemble and leak-test all components. Fill with dechlorinated water — leave tap water to off-gas for 24 hours in an open container, or use a liquid dechlorinator. Run the pump and check every join for drips.
- Add an ammonia source. A small measured dose of pure, unscented ammonia or a pinch of fish flakes targets 5–10 ppm ammonia concentration — enough to fuel bacterial growth without overwhelming the system.
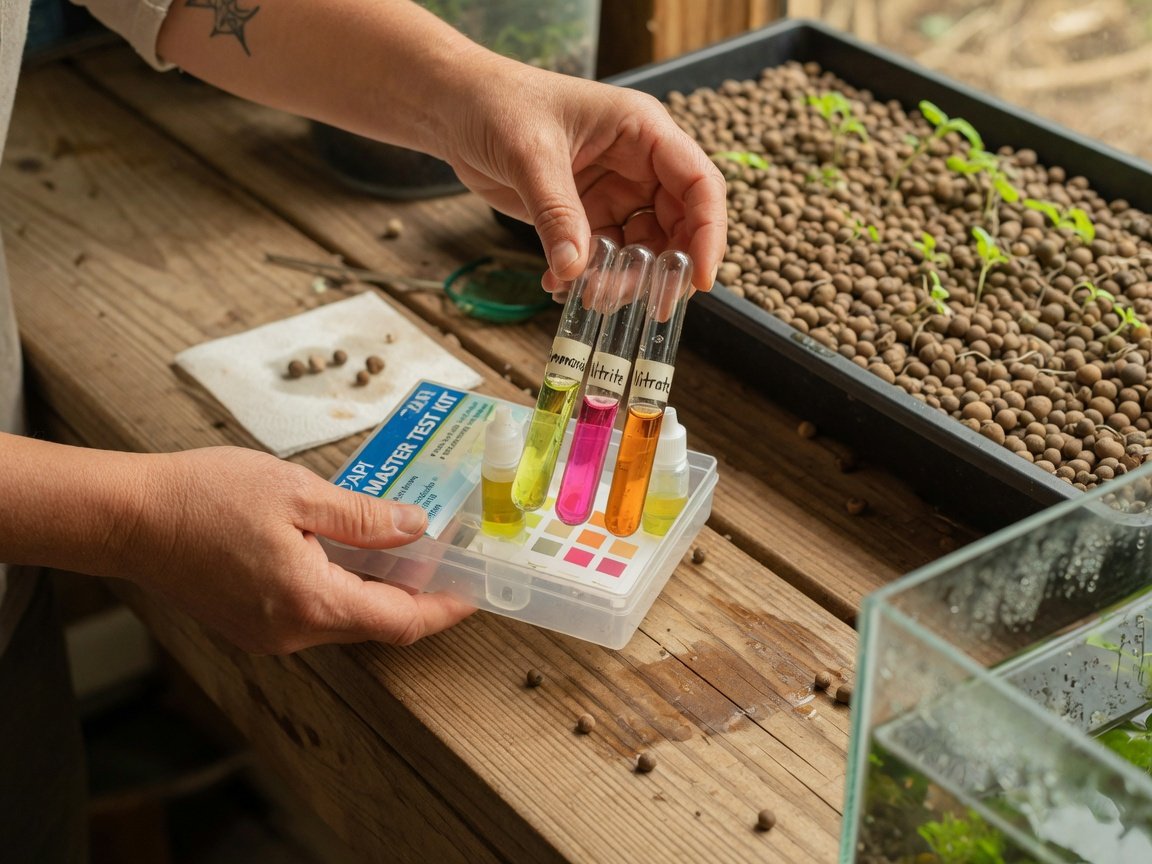
- Test daily with a liquid test kit. Track ammonia, nitrite, and nitrate. Record the numbers. Ammonia spikes first. Nitrite rises next as Nitrosomonas bacteria establish. Nitrate appears as Nitrobacter take hold. This is the sequence you want to see.
- Add bacterial inoculant on day 1 and day 7. Keep the pump running 24 hours a day throughout the cycling phase to ensure oxygenated water flows continuously through the media where bacteria are colonising.
- Confirm cycle completion. Ammonia and nitrite should both read near zero (under 0.5 ppm). Nitrate should be measurable in the 5–20 ppm range. This is the green light for fish introduction.
- Introduce fish gradually. Start at 25–30% of your target stocking density. Feed lightly — only what fish consume within three to five minutes. Test water twice weekly for the first month after stocking.
- Add plant seedlings after the first week of fish introduction. Seedlings in net pots placed directly into the media establish quickly and begin drawing down nitrate immediately — which stabilises the system faster than fish alone.
The practical mechanics of assembling and plumbing a media bed system — including bell siphon setup, pump sizing, and common first-run mistakes — are covered in detail in the step-by-step guide to building your own aquaponics system at home.
How Do You Keep Your System Healthy Week to Week?
Once your system is cycled and stocked, maintenance settles into a manageable and genuinely satisfying routine. The five parameters to track are pH, ammonia, nitrite, nitrate, and dissolved oxygen. Most backyard growers test twice a week during the first three months, then move to weekly testing once the system has demonstrated stability across seasonal temperature changes.
| Parameter | Target Range | If Out of Range |
|---|---|---|
| pH | 6.8–7.2 | Buffer up with potassium bicarbonate; buffer down with phosphoric acid — never more than 0.2 units per day |
| Ammonia (NH₃) | < 0.5 ppm | Reduce feeding rate; perform 20% water change; check for dead or hidden fish |
| Nitrite (NO₂) | < 0.5 ppm | Partial water change; increase aeration; check media for compaction blocking flow |
| Nitrate (NO₃) | 5–80 ppm | Above 80 ppm: partial water change. Below 5 ppm: review plant loading or check feeding rate |
| Dissolved oxygen (DO) | > 6 mg/L | Add aeration; reduce stocking density; check air stones and pipework for biofilm blockages |
| Temperature | Species-specific | Add shade or insulation; install heater or aquarium chiller as needed |
Weekly tasks are straightforward: top up evaporation losses with dechlorinated water, confirm the pump and air stones are running cleanly, inspect plant roots for brown or slimy growth (a sign of low dissolved oxygen, not disease), and scan fish for unusual behaviour, clamped fins, or visible spots. A daily two-minute visual check takes almost no time once it’s habit and catches most problems at the earliest possible stage.
Monthly, flush any mechanical filter components — swirl filters or sump chambers — and perform a 10–20% partial water change to manage dissolved mineral solids that accumulate beyond what plants can process. In a well-balanced mature system this becomes less frequent over time; some established setups run for extended periods between full water changes once the fish load and plant volume are properly matched.
Algae on tank walls is normal and harmless — it’s a sign of light and nutrients, which your system has in abundance. Algae competing actively with plants in the grow channels signals too much light reaching the water surface; shade the channels or cover exposed water runs. Pest management operates under one firm constraint: most chemical pesticides and herbicides are toxic to fish and to the bacterial colony. Physical removal, beneficial insect habitat, and companion planting are the tools available to a backyard aquaponics grower.
How Can Aquaponics Fit Into Your Garden Design?
A well-designed aquaponics setup doesn’t have to look like a plumbing experiment. With a small amount of attention to materials and layout during the build, it can become one of the most visually interesting features in the garden — the kind of thing visitors ask about immediately and neighbours want to replicate.
Fish tanks drive the aesthetic. An IBC tote wrapped in horizontal timber cladding reads as a raised garden feature, not a freight container. A round fibreglass tank set into a stone or pebble surround mimics a garden pond. A gentle water cascade returning from the grow beds — made by drilling a small notch in the return pipe outlet — adds movement and the sound of running water that ties the whole space together.
Grow beds planted with mixed crops have inherent visual appeal: tall tomato plants or climbing beans at the back, trailing nasturtiums or strawberries at the front edges, compact herbs filling the gaps. A simple timber trellis framed in the same material as the bed sides adds vertical structure and provides afternoon shade for heat-sensitive crops in summer.
For year-round productivity in temperate or cold climates, enclosing the system in a greenhouse or polytunnel extends the growing season, protects fish from extreme temperature swings, and creates a genuinely pleasant working environment even in winter. Choosing the right enclosure involves balancing size, ventilation, glazing material, and budget — the dedicated guide to choosing an aquaponics greenhouse for year-round production covers all the key variables in detail.
What Does Backyard Aquaponics Look Like in 2026 and Beyond?
The backyard aquaponics landscape in 2026 is notably more sophisticated than it was three years ago. Better consumer-grade monitoring technology, wider fingerling availability, more open-source build documentation, and a growing community of practitioners sharing detailed system performance data online have all lowered the barrier to entry and raised the quality ceiling simultaneously.
Smart monitoring is becoming standard. Low-cost IoT sensors — pH probes, dissolved oxygen meters, temperature loggers — now connect directly to phone apps for under $100 in many configurations. Growers using real-time monitoring catch parameter drifts within hours rather than days, substantially reducing fish losses from overnight chemistry shifts that would previously go unnoticed until morning feeding.
Vertical and space-efficient designs are proliferating. Tower systems using NFT channels, zip-grow towers, and stackable raft panels are integrating into balconies, patios, and small urban courtyards that couldn’t accommodate a traditional media bed layout. These compact configurations trade some biological stability for space efficiency — a sensible trade for growers in dense urban environments with limited outdoor footprint.
Solar and rainwater integration is increasing. Pairing a small solar panel and battery with the aquaponics pump and aeration reduces operating electricity costs to near zero in sunny climates and provides meaningful resilience during grid power outages — historically one of the most acute risks for an aquaponics system, given that a stopped pump means falling dissolved oxygen within hours.
Community knowledge networks in 2026 are far richer than in previous years. Online grower forums with verified system journals, regional aquaponics clubs, and open-source build databases mean a first-time builder has access to real-world performance data from documented systems before spending a dollar — not just manufacturer marketing material and theoretical guides.
Frequently Asked Questions
How long does it take to set up a backyard aquaponics system?
Physical assembly of a basic media bed system takes 1–3 days for a prepared builder with all materials on hand. The biological cycling phase then takes 4–6 weeks before fish can be fully stocked at target density. From first material purchase to a fully stocked, productive system: allow 6–8 weeks in total.
What is the easiest fish for a beginner aquaponics system?
Tilapia is the most forgiving edible species — tolerant of variable water conditions, fast-growing, and widely available as fingerlings. For growers in cool climates where tilapia needs supplemental heating, goldfish make an excellent learning species: they’re hardy, inexpensive, widely available, and handle the water quality fluctuations that are normal in a new, maturing system.
Can you run a backyard aquaponics system year-round?
Yes, with the right design. In warm climates with consistent temperatures above 60°F year-round, an outdoor system runs continuously without modification. In temperate or cold climates, a greenhouse enclosure or insulated tank setup extends operation to 12 months. Crop selection also matters: cool-season leafy greens — lettuce, spinach, kale — tolerate lower temperatures that would slow or stop warm-water fish like tilapia.
What are the biggest disadvantages of backyard aquaponics?
The main drawbacks are: higher upfront cost than a basic soil garden, the 4–6 week cycling wait before full production, ongoing monitoring that can’t simply be paused for two weeks without cover, vulnerability to power outages that stop pumps and drop dissolved oxygen, and the incompatibility of most chemical pest treatments with fish health and the bacterial colony. None of these are dealbreakers — but understanding them before you build sets realistic expectations.
How many fish do you need to grow vegetables in aquaponics?
The standard guideline is 0.5 lb of fish per gallon of water at moderate stocking density. A 100-gallon starter tank can support up to 50 lbs at maximum capacity, but you’d begin with 10–15 fingerlings and allow the fish population to grow as the system matures. That fish load paired with 15–20 sq ft of grow bed can produce continuous leafy green harvests for a family of three to four.
Why do aquaponics systems fail?
The most common failure modes are: introducing fish before the nitrogen cycle is complete, power outages crashing dissolved oxygen, overfeeding driving ammonia spikes, and neglecting pH — which, if it drops below 6.5, inhibits the bacteria responsible for the entire nutrient conversion process. Most failures are entirely preventable with a reliable test kit, a battery-backed aeration backup, and patience through the cycling phase.
How to build an aquaponics system step by step?
The sequence is: (1) map site for sunlight and water access, (2) size the tank and grow beds for your fish load and harvest goals, (3) assemble components and leak-test with dechlorinated water, (4) cycle for 4–6 weeks until ammonia and nitrite reach near zero, (5) introduce fish at 25–30% stocking, (6) plant seedlings into the media, and (7) establish a weekly testing and maintenance routine. Each step has sub-decisions — fish species, grow media type, pump sizing — but this sequence doesn’t change regardless of which options you choose.
Ready to Build Your Backyard Aquaponics System?
Backyard aquaponics is one of the few food-growing approaches where the biology works consistently in your favour once it’s established. Fish feed bacteria; bacteria feed plants; plants clean water for fish. Your role is to maintain the balance — not to manufacture it from scratch each season. The system handles the heavy lifting once you’ve given it the foundation it needs.
Every shortcut in the setup sequence carries a predictable cost. Rush the cycling phase and fish die. Under-size the grow beds and water quality drifts. Choose the wrong fish for your climate and you’re fighting temperature management every week instead of harvesting food. The steps aren’t complicated — they just need to happen in order and at the right pace.
Here is a practical implementation timeline for a backyard system started in 2026:
- Week 1–2: Site survey, system design, sourcing materials and equipment.
- Week 3: Assembly and leak testing. Fill with dechlorinated water. Begin cycling with ammonia source and bacterial inoculant.
- Week 4–8: Daily water testing through the cycling phase. First plant seedlings can go in from week 4.
- Week 6–8: Cycling confirmed complete. Introduce first fish at 25–30% target stocking density.
- Month 3: System stable. Increase stocking to 50–75%. Regular leafy green harvests begin.
- Month 6: Full stocking density reached. Fruiting crops added if desired. Weekly maintenance routine fully embedded.
Start conservatively, run it well, and expand only when the system earns your confidence. A productive, well-designed backyard aquaponics system growing real food for your family is entirely achievable in 2026 — and genuinely worth the effort it takes to get there.